Optimize Images to Improve Sustainability
Optimize your images to decrease page load times for better sustainability, usability, and accessibility. In this post, we show you how.
High-quality images provide significant value in web content:
- They make online content easier to read by breaking up large blocks of text and providing contextual information.
- Good visuals also stir up emotional responses and help to convey a brand’s promise.
- Also, people are more likely to share blog posts with images versus text-only posts.
- Plus, quality images can even improve page conversions.
However, as the web grows more complex, challenges related to image optimization rise accordingly. Images that aren’t properly sized or optimized can also slow down page load times. This frustrates users and increases page abandonment. Also, improperly compressed images contribute significantly to the internet’s environmental impact.
What’s more, lightweight pages are not only good for sustainability, they tend to improve search rankings and work better with assistive technologies for people with disabilities or those in low-bandwidth areas. Also, they are a key component of sustainable web design.
In this post, we explore how to optimize images to improve page performance for better website sustainability, accessibility, and search performance, all part of a more sustainable content strategy.
Uncompressed Images Undermine Sustainability
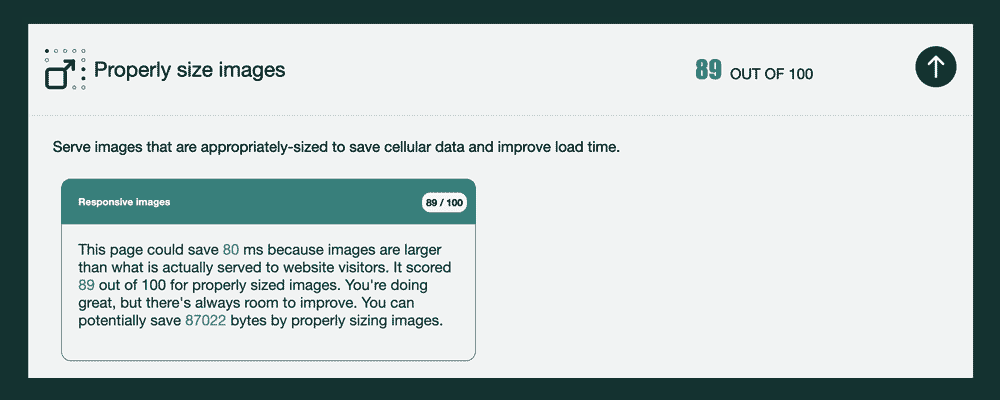
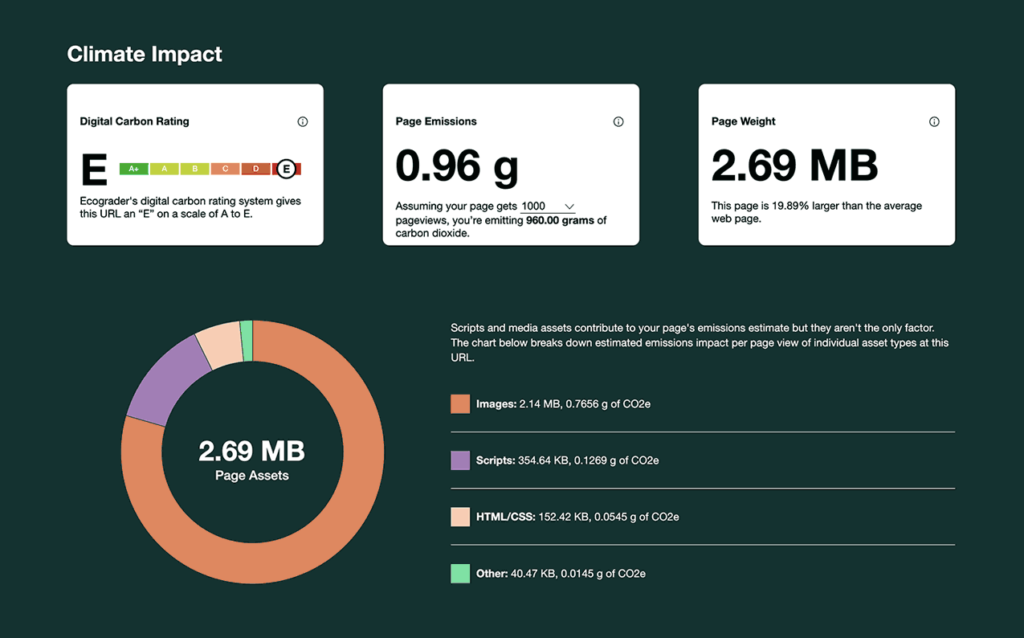
Our web sustainability tool Ecograder has crawled millions of websites since it was launched in 2013. By far, the most common issues that arise in Ecograder reports are related to image and media compression (see image above). Unfortunately, the vast majority of websites have room for improvement when it comes to optimizing images.
Plus, pixels need power to appear on your screen. Web servers and networks that deliver content to customers plus end-user devices require massive amounts of electricity. Unfortunately, most of this electricity is generated by sources that aren’t clean or renewable. This drives up digital emissions and undermines digital sustainability.
We can do better.
Image Formats
When you take a photo or create an image then save it in a web-friendly format, the image is compressed. Data is thrown away and file sizes becomes smaller. This is key for delivering speedy digital experiences to people who use the web.
Unfortunately, not all image formats are created equal. This is especially true for web formats, which is why it’s important to select the correct file type for an image or illustration you plan to embed in a web page or share via social media.
For many years, images served via the web were primarily downloaded as JPEGs, PNGs, or (gasp!) GIFs. Browsers continue to support these image formats. However, their compression schemes leave room for improvement.
More recently, vector illustration formats like SVG and new compression-friendly image formats like WebP or AVIF have allowed image file sizes to shrink while still retaining high image quality. This is critical for both improved usability and sustainability.
Unfortunately, this can also prove challenging for websites with hundreds or even thousands of images in legacy formats. While a content audit can help you identify these problems, many organizations choose to ignore this, often because the lift to swap legacy images with new versions is too heavy.
With that said, tools to update images sitewide to newer, lightweight formats are readily available. We should encourage their use.
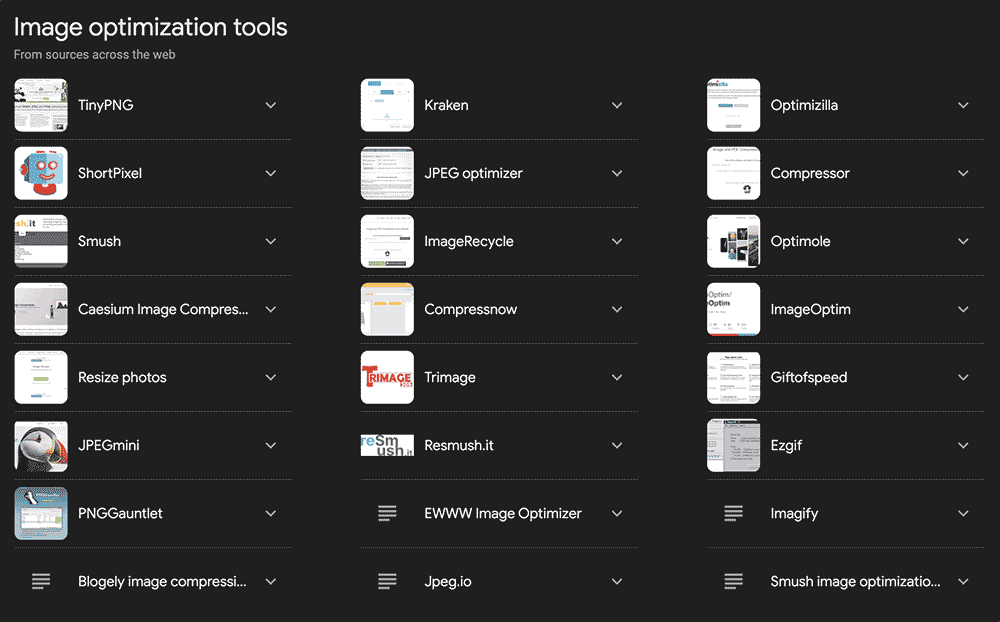
Image Optimization Tools
While a full list of image editing and optimization tools is beyond the scope of this post, suffice to say there are dozens available, many of them free or low cost. Any of these tools will compress file size while still retaining high-fidelity images. Some do this in code while others provide visual interfaces.
Also, we appreciate this list of mage optimization tools from Smashing Magazine for its level of detail. Examples include clever names like:
- JPEG Stripper
- Shrink Me
- Optimizilla
- And many more…
Plus, if your site uses WordPress, a quick search includes nearly 1,400 plugins related to image optimization. Some of these might save you significant time if your media library is large. However, WordPress plugins, like many third-party services, come with their own set of sustainability challenges.
Resizing Images
Next, the vast number of devices and platforms on which we view content further complicates how we optimize and resize images. Questions that often come up include:
- Do I need to create separate images for each display size?
- Can I resize an image using code without resizing the image itself?
- Can’t I just let my content management system take care of this?
For sustainability, we always want to minimize data downloads while simultaneously improving page experience. W3 Schools offers a great breakdown of how to approach images in responsive web design, including cropping, scaling, and setting height and width attributes using CSS. Start there.
CSS Sprites
Next, CSS sprites combine multiple images into a single image to maximize page speed and minimize HTTP requests. This is useful for icons, logos, and other visual elements that are used repeatedly across your website.
For more information, read our post How CSS Sprites Improve Speed and Sustainability.
Always Be Testing
Finally, it’s important to test image display across devices and platforms. Nothing undermines usability faster than a page that wasn’t designed for the display size you’re viewing it on. Unfortunately, this is an all too common problem.
However, it’s also a problem with an easy fix. Tools like BrowserStack and others allow you to preview page layouts (including images) at different screen or display sizes before publishing them live.
If you don’t have access to browser testing tools, resize your browser window or view the content on a phone or tablet. If you see wonky page breaks, you know there’s room for improvement.
Learn More About Optimizing Images
Addy’s new book focuses on what matters: modern approaches to image compression and image delivery, practical tools and techniques to automate optimization, responsive images, current and emerging image formats, how browsers load, decode and render images, CDNs, lazy-loading, adaptive media loading and how to optimize for Core Web Vitals. Everything in one, single, 528-pages book.
— Smashing Magazine, From AVIF to WebP: A New Smashing Book By Addy Osmani
Image optimization is core to web sustainability and to provide a great experience for the people who visit your site. For a more in-depth look at this topic, check out Smashing Magazine’s book, Image Optimization by Addy Osmani. It covers everything you could possibly want to know about image optimization.
Not sure if the images on your site need optimizing? Crawl a page using Ecograder and look for the image and media recommendations included in its reports.
Got questions? Feel free to contact us.
Ecograder Beta, Now with WSGs
Improve digital product or service sustainability. While still in beta, the new version now includes recommendations based on the World Wide Web Consortium’s Web Sustainability Guidelines.